
It takes less than 5 seconds to make a full swing. Before you even know it, you hit the ball. It can be pretty challenging to be conscious of every movement in a golf swing, feel it and do it in order. Then again, golf has never been easy. From the day you held the golf club for the first time to today, when you are paying attention to the details of the golf swing sequence as well, it always took effort. This always will. You haven’t given up yet, which shows your passion and love for golf.
Now let’s make that passion a means to make your golf swing sequence right on the golf course. You can make your swing more powerful and consistent by following the proper swing guide. That will add speed and distance to the shot. It also helps to make the golf balls go in the right direction. And all of these will eventually help you keep your golf score lower.
extoc
Table of Content
The Right Swing Sequence
What is the proper golf swing sequence?
What is a proper golf swing sequence?
In short, the sequence goes leg-torso-arms-hands-golf club. If we elaborate, it goes into 5 main things- address, backswing, downswing, impact, follow through. There are steps to follow in these 5 sections too. You need to know the movement of very milliseconds to get it done amazingly.
You must be thinking different people follow different sequences. Even the PGA tour professionals with the same handicap have slightly different swing sequences. Which one should you follow? True that it is different for everyone. But for now, we are going to keep things simple by dividing the swing sequence into the main 5 sections. Let’s get down to that without any further delay.
1. Address: Set up a precise position
Did you know golfers’ inside joke where one says “address the ball” and the other says “Hi ball”? We definitely know that you are not the latter one. Nor do we mean that you don’t know how to address the ball. We just want you to recheck your address position whether it’s the suitable one for your swing sequence or not. And be more confident about it.
A wrong address can ruin the whole swing sequence in the very beginning. It may hold the swing back. Go step-by-step while addressing the ball.
Step 1. Correct golf ball position at the address
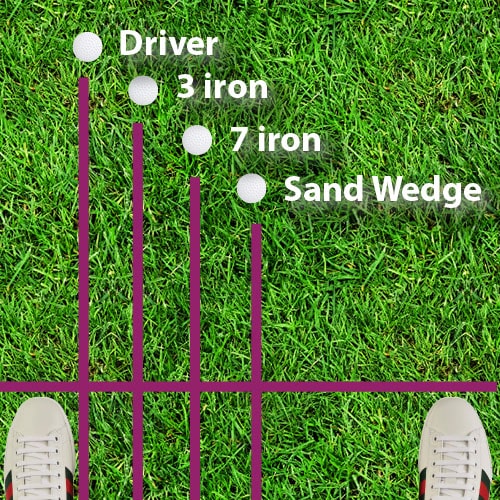
Golf ball position needs to be different depending on the club you have pulled out of your golf bag. For example, if you are hitting the golf driver or 3-wood, the golf ball should be near your left foot. While with golf irons, it should be slightly toward the right. Position the ball gradually toward the right as the iron number increases.
That being said, for wedges, the golf ball position starts to go toward the middle of two heels to the right foot. So when you hit with a pitching wedge, the ball should be relatively in the middle position of your two heels. Then, it should go a bit toward the right for a sand wedge.
Step 2. Adjusting the feet position

You already know that your feet should stay apart. But how much? You need to widen your stance for longer clubs. As the clubs go shorter, you need to have a narrower stance. Your stance for the golf drivers or fairway woods should be wider than with the irons. And for shorter irons, you can bring in your stance by a 1-3 inch.
Then, turn the left foot’s toe toward the target for a better follow-through at the end of the swing. And it’s the other way around for left-handed players.
Step 3. Correct club head position and shaft lean

Position the clubhead directly behind the golf ball at the address. The shaft leaning toward the target shouldn’t be more than 1-2 inches from your belt buckle. If the club gets ahead of the body, the transition between backswing and downswing may not be smooth. That will make the shot curve away from the target. It may also cause digging.
Step 4. Proper posture for addressing the ball

- Stand keeping your legs straight at first.
- Keep your arm straight too and let your hands hang comfortably. Have a proper grip on the club.
- Tilt forward from your hips only.
- Finally, bend your knees slightly, and you are in an excellent posture for the backswing.
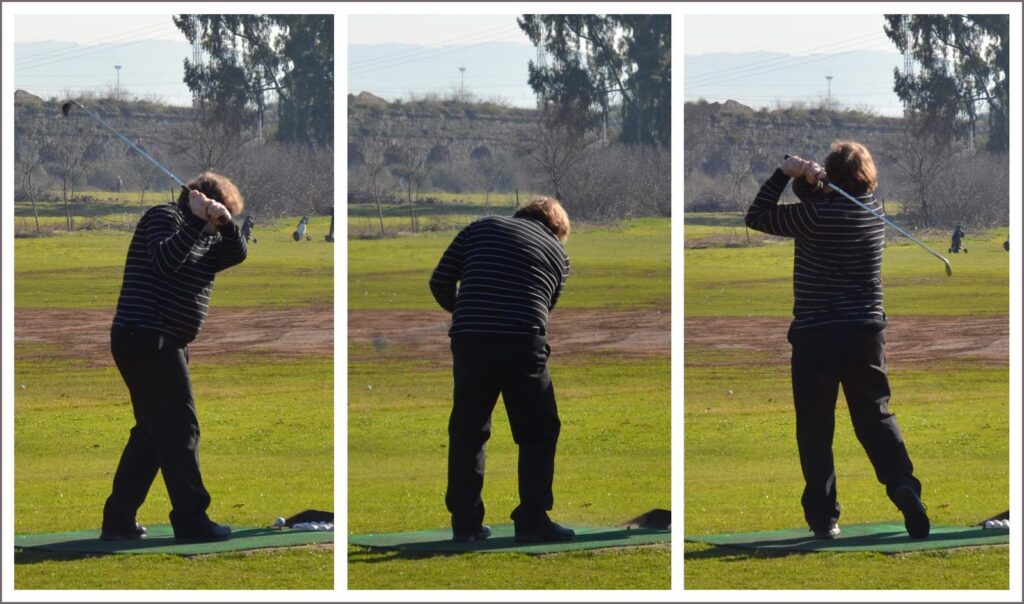
2. Backswing: Correct the 3 main parts

You need to have a proper stance, posture, grip, club head position, and shaft lean right before going in for a backswing. Any small mistake in those steps can hold back the swing from going toward the next stage. That may cause the whole swing sequence to go wrong. So, make sure to follow them first.
You may often see ‘takeaway‘ mentioned right before backswing in the golf swing sequence. But it is a part backswing too. It is till the time when your hands get to the waist-high. The part after that is called halfway back. It starts right after takeaway. And the last part is the top of the backswing when you are ready to go into a downswing. To make all 3 parts of the backswing easier, we are putting it together step by step.
Takeaway: Make a successful takeaway in 3 simple steps

Step 1: A good takeaway is when you move the hands, arms, and shoulders together in 1 piece. So, try as much as possible to maintain that. You already adjusted the posture at the address. Stick to that.
Step 2: Now, move the golf club straight back.
Step 3: Work back your right leg behind and make your left shoulder stay slightly down.
Halfway back: fix it in 3 easy steps
Step 4: Let your wrists hinge up. It helps to keep the club on the plane.
Step 5: Keep your arms as straight as you can. Your right arm may bend a little.
Step 6: Stay in the posture you had at the address and rotate your hips and shoulder together.
Top of backswing: Follow these 3 steps to get into an optimal stage

Step 7: Point the golf club directly to the target. It helps to keep your swing on the plane.
Step 8: Keep the back of your front hand parallel to the clubface. This is to keep the clubface straight. It will help to make straighter shots.
Step 9: Try to rotate your hips near 45° and the shoulders near 90°.
3. Downswing: Don’t rush, go step-by-step
To put in simple words, downswing means swinging down, just like the name. The movement occurs right after the top of the backswing and before the impact stage.
When your golf club is at the top of the backswing, the speed drops to 0 mph. Therefore, you need a powerful downswing to achieve an increased swing speed at impact. That will help you gain a better distance. It influences the accuracy of the shot too.
But that doesn’t mean you need to go aggressive and rush toward the downswing. That’s not the case. So the first and foremost thing to remember while going for the downswing stage is never to rush it. Instead, keep your head calm and follow the downswing sequence one by one for a successful shot.
Step 1: Shift your weight on your left foot or front foot. You may think that your downswing starts with your big muscles. But it doesn’t. In fact, starting with an aggressive hand or arm movement would instead make your sequence go wrong. It’s a big mistake.
Many golfers fall for it thinking that it will help them make a powerful shot. But it’s the other way around. So, when you start to take the downswing, make sure to start working with the foot.
Step 2: Turn toward the target with your hips, knees, and chest, keeping the lead shoulder down. It is to make the shots more consistent at impact.
Step 3: Move your torso and arms naturally. Let your hips and knees follow. Ensure that your trail elbow is under the lead elbow and close to your body.
Step 4: Try to make the least movement with the other parts of your body, especially your head. Moving any other part of the body may manipulate the direction of the shot.
Step 5: Now, hold out your hands and arms into impact.
4. Impact: Make solid contact with the ball

Finally, we are at the part of the swing where the club makes contact with the golf ball. For this very reason, you need to be more careful during the impact stage. After successfully following all the steps at address, backswing, and downswing, you have paved a way to make a good impact position. Now all you need to do is to follow the steps below for the strike-
Finally, we are at the part of the swing where the club makes contact with the ball. For this very reason, you need to be more careful during the impact stage. After successfully following all the steps at address, backswing, and downswing, you have paved a way to make a good impact position. Now all you need to do is to follow the steps below for the strike-
Step 1: Put 80% of your weight on the left side of your body.
Step 2: Bend your wrists toward the target and keep your left wrist flat.
Step 3: Start to lift your right heel.
Step 4: Look at the back of the ball.
Step 5: Keep your hips and shoulders in an open position.
Step 6: Move the golf club as fast as you can.
Step 7: Target to hit the bottom of the ball. For golf drivers and iron shots, approach the ball slightly from inside with your club. But move the golf irons downward and the drivers in an upward motion while making the strike.
5. Follow-through: Make a proper finishing

The follow-through or finishing stage may seem unnecessary after striking the ball at the impact stage. Because it won’t change anything about the shot you have already made. Though it is true, that doesn’t mean it is less critical.
The finishing should give you confidence whether you are hitting with golf wedges, irons, or drivers. That’s what follow-through does for you. This stage lets you know if anything was off with the shot, pretty much like a diagnostic tool. Eventually, you can strike a better shot with this feel next time.
Not only that, a consistent finish after every shot helps to make consistent shots. It saves your body from injury. Check out the steps below to ensure a good follow-through.
Step 1: Don’t move your upper body too much. Instead, let your lower body do the work at first.
Step 2: Make sure that your club finishes behind your head or shoulders.
Step 3: Your arms should be in a comfortable position, keeping the front elbow in a slightly higher position.
Step 4: Like the impact stage, most weight needs to be on the left side and the other way around for left-handed golfers.
Step 5: To balance the weight on the front or left foot, raise the back heel in the air.
Step 6: Your chest and shoulders should end up facing toward the target.
Watch the following video from ChrisRyanGolf for a visual explanation of getting in a perfect golf swing sequence. (if needed)
Swing Sequence of Professionals
Swing sequence of Tiger Woods
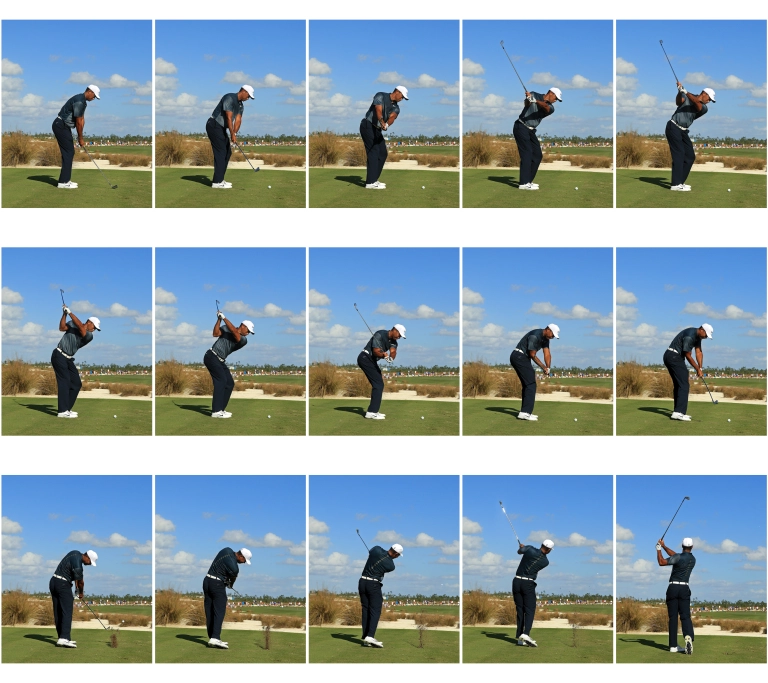
Let’s look at Tiger Woods’ 2020 Masters frame-by-frame swing sequence.
Let’s look at Tiger Woods’ swing sequence in the 2020 Masters step-by-step.
Step 1: Tiger Woods kept his hips over the ankle and chest over the ball at the address. He allowed his hands to hang comfortably.
Step 2: He started the backswing with his upper body, keeping the hands straight. His hands, arms, and shoulders worked as one piece.
Step 3: Then, in the halfway-back stage of the backswing, he let his wrist hinge up.
Step 4: As soon as the club reaches behind his head, he drops the club and rotates toward the ball.
Step 5: When his hands reach the waist height during the downswing, his right elbow almost touches his body. Then, he strikes the shot.
Step 6: He doesn’t stop it right there. Tiger Woods gets a good finish after that. In his follow-through stage, his body turns entirely toward the shot, and both of his hands reach the height of the left side of his head.
Though the basics were the same, there were some significant differences in Tiger Woods’ swing sequence at his comeback in PNC Championship, alongside his son, Charlie. After his car accident in February 2021, where Tiger almost lost his right foot, most of the swing changes were pretty much connected with the injury of his right leg that was caused 10 months ago. So, for example, he shortened the backswings, kept the right foot more on the ground, and made the follow-through more confined than before.
Analyzing and Improving Your Swing Sequence
There is always room for improvement. Also, it’s crucial to always keep the swing sequence in check to perform better. Although working with an instructor or coach is the best, it’s not always possible. So, here are a few methods and training aids you can use as alternatives.
Methods to self-analyze and improve
Method 1: Record and Review: The first way and the best way to improve your swing sequence is to know your swing sequence. As it takes only a few seconds to make the whole swing, it can be tricky to know where it is going wrong. Make a slow motion video of yourself while striking a ball. Analyze it frame-by-frame to see where it is going wrong.
Method 2: Using a mirror: Address the ball in front of a full length mirror. Then, practice takeaway, backswing, downswing and finish with a follow-through. Observe your body movement on every stage. It lets you understand your swing sequence better and make necessary improvements.
Method 3: Focus on Key Areas: Simulate how you will strike the ball with your golf club. Do that as slowly as you can, keeping every movement in mind. Add a little bit of speed every day. If you keep doing this drill, you will eventually get used to maintaining the swing sequence this way.
Using training aids for better practice of swing sequence
Training aids are a convenient answer for increasing the quality and effectiveness of your practice sessions. Using them properly can lead to quicker and easier improvement.
Swing analyzers

You may use a golf swing analyzer like Blast Motion to improve your swing sequence. Along with the swing metrics and training layouts, it automatically creates video clips. It also has a slow-motion feature to help you analyze.
Weighted trainer

Training aids like Orange Whip are designed to make your swing sequence smoother. When you practice with a weighted club or trainer, you become more aware of every stage and use more force to make every shot. Later, it becomes easier to have a smoother, balanced and faster swing sequence with your golf clubs.
Alignment stick
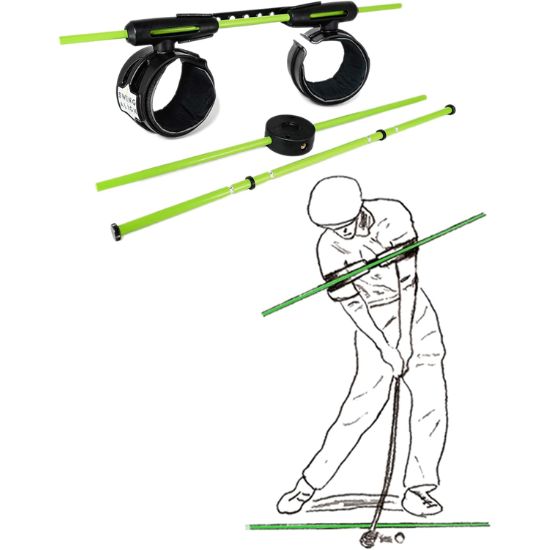
Wearable alignment sticks like Swing Align are great multi-tasker at a reasonable price. It not only improves the alignment, but also lets you know that your swing sequence is on point immediately. It helps to make correct muscle memory of the swing by preventing you from moving back way too far or by helping you stop at the top of backswing.
Does the golf swing sequence change based on the club you are hitting?
You don’t need to change your swing sequence because of the club you are using. You mainly need to change the golf ball position and the setup at the address. The swing plane and your follow-through feel may be slightly different because of the club’s design or shot type. However, the basics and steps will still be the same.
\
Conclusion
A good golf swing sequence isn’t something you can have a good hold on within a week. It takes months and even years to do that. So you need patience, determination, and consistency. But don’t strain yourself in this process. That would instead be harmful to you.
Hopefully, this article has given you a good understanding of how your swing sequence should be. Feel free to leave your questions, suggestions and opinions in the comments section.
Happy golfing!
Conclusion
A good golf swing sequence isn’t something you can have a good hold on within a week. It takes months and even years to do that. So you need patience, determination, and most importantly, love for golf. But don’t strain yourself in this process. That would instead be harmful to you.
Hopefully, this article has given you a good understanding of how your swing sequence should be. Feel free to leave your suggestions and opinions in the comments section.