What can be more satisfying than putting a ball on par score or even below par? Putting can be the glory shot of your biggest victories and achievements as it is the ultimate goal of the game.
Maybe this is why most golfers; both professionals and beginners feel nervous prior to putting a ball. The practice is the best solution for gaining confidence in these tense situations.
You can practice on a golf mat, on a golf course, or using an indoor golf simulator, with putting aid, or on a putting green.
You may also like: DIY Golf Mats : The New Way to Practice
You can choose any of the aforementioned methods. But putting green is preferred by many golfers to practice putting balls indoors.
You can certainly own ready to use putting greens. Check out our expert’s review on the 10 best-putting greens here.
But if you are cost-conscious and looking for a better and cheaper alternative, then building a putting green indoor might be the cost-efficient choice for you.
Better, because you can design your putting green on your preference. Cheaper, because the cost of the required items is very much affordable as well as set up cost is low too.
Even you can do it by yourself . In this article, we are going to explain how you can DIY putting green and what elements you should consider when planning your own.
We have also included a visual of the process for your better understanding, which you will get at the end of this article.
DIY Putting Green
The process is as simple as you like. We have discussed the process with a few simple steps. 7 steps to be exact.
Follow the instructions and you will be able to make indoor putting greens in a few hours only.
It might not be difficult if you read out the complete article first and then try to execute it step by step.
Besides, I will include a video in the later part that will ease your understanding of the process.
Step 1: Assemble the essentials first.
Here is the list of items you will be needed to complete the process of making an indoor putting green:
Tools for framing the putting green area
- Circular saw
- Power drill (with various drill bits)
- Screwdriver (or screwdriver bits)
- Sandpaper
- Hammer
- Tape measure
- Screws
- Carpenter square or 90° ruler
- Trowel
Prerequisites for putting green
- Framing wood
- Flooring plywood/composite board
- Putting mat
- Cups
- Carpet Adhesive
- Carpet knife
Step 2: Concept to blueprint
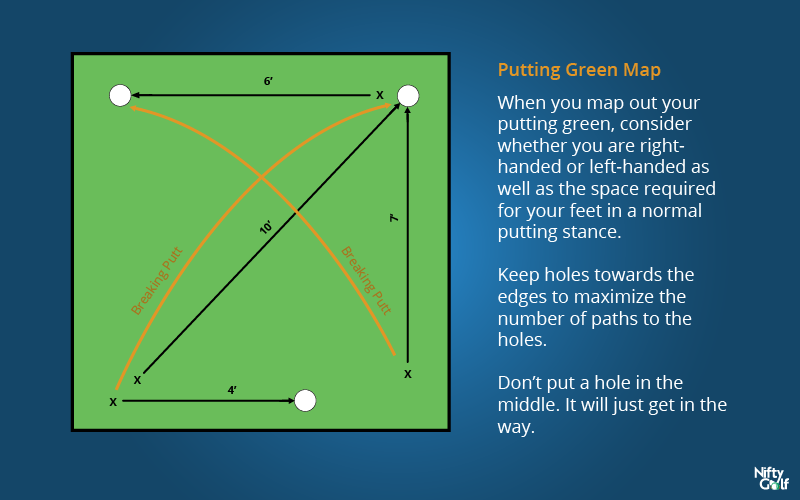
After assembling all the essentials, it is better to visualize the concept of putting green you are expecting as an outcome.
Blueprint the concept regarding the measurements and sizes, slopes, hole positions, and so on. Plan according to the available space and surface.
We would suggest designing a green with multiple holes so you can practice from different angles.
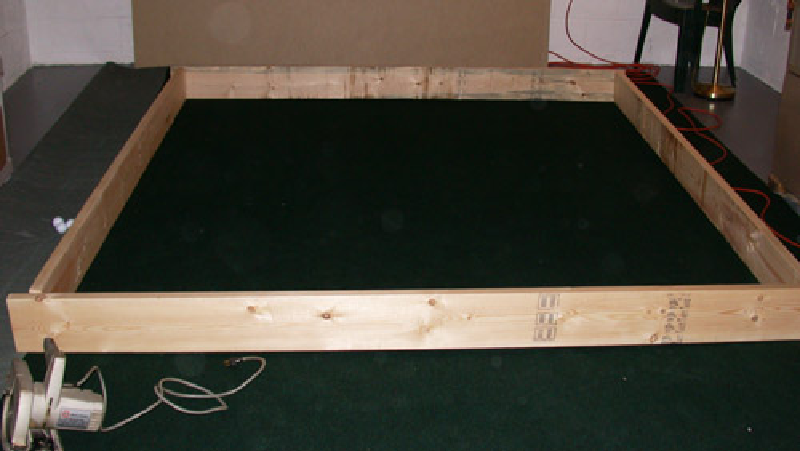
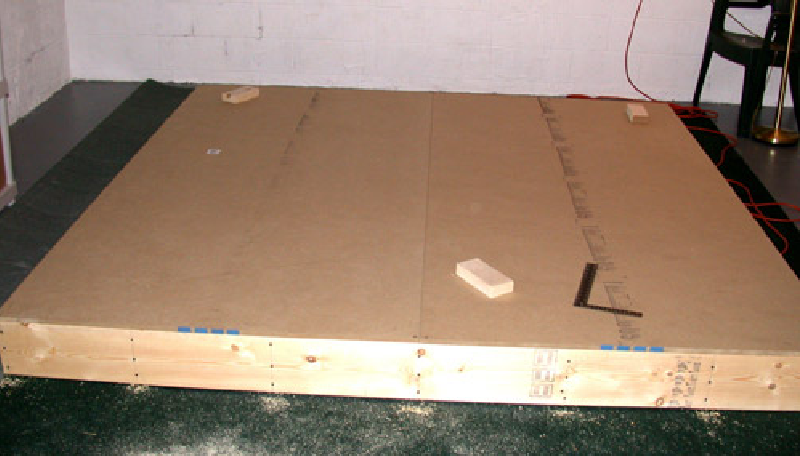
Step 3: Framing
Now it is time to execute the concept. Cut the framing wood according to the required size based on your available space.
Fix the outer frame first. Take the help of carpenter square, to give it a proper balanced shape. Cut the unnecessary parts (if any).
Note that your outer frame width of the framing wood should be higher than the inner frame.
The outer frame will also work as a boundary to restrict the balls going too far away.
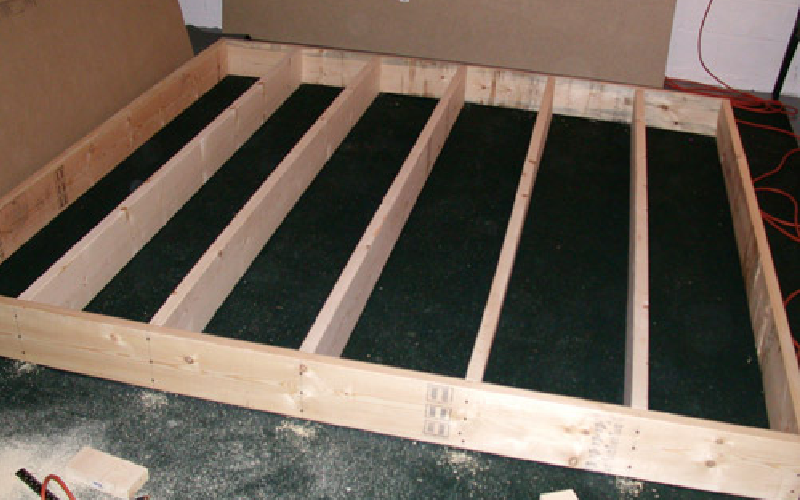
Now for the inner frame, assemble the wood pieces and cut them to the fitting size. Attach them to the outer frame.
Fix them in a way that they are tight and there is no gap in between. Use measure tape to ensure equal distribution.
This will help keep the balance of the frame and proper weight distribution.
Step 4: Affix the flooring plywood/composite board
You should have flooring plywood or composite boards with you by now, as I have mentioned the prerequisites earlier.
Cut the board according to the size of the outer frame and fix it with the frame using screws and screwdrivers.
Prior to attaching the plywood it is better to mark where the support beams are under the plywood so that you can avoid them when choosing cup position.
Or if you have calculated it properly in the blueprint step, you can just check your calculations are going as you planned or not.
Step 5: Make a hole and install the cup
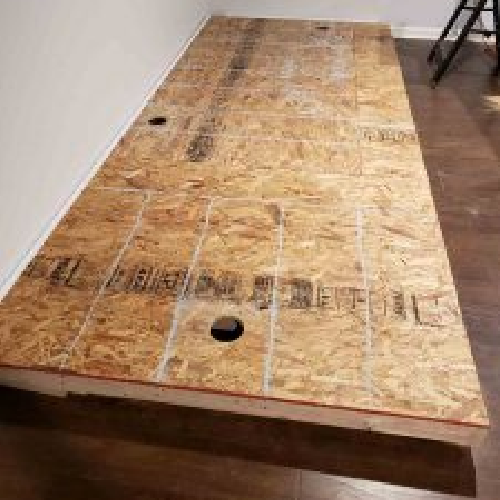
You might have got a good idea of the size of the putting green you are going to have. Recheck the hole positions before making it.
Because adjusting the hole’s position after this will not be a wise decision. When you are sure about the position, take the drill and make a hole to place the cup.
Be very careful here, else you can injure yourself too. Once you are done with drilling, install the cups in it.
Cups should fit in with ease. You can use a hammer here if they are too tight to the hole. But make sure they are not loose.
Step 6: Attach the putting mat
Brush up the top of the plywood installed to clear any dust so that the putting mat can be plain and no obstacles under the mat that can create a bump.
Now roll out the putting green turf and position it so it covers your entire platform. Make sure there are no gaps and the turf is sitting well in the position.
When you are satisfied with the positioning of the mat mark the hole first. Because it might get tough to find the hole once the mat is glued down.
Rollback a few feet on one side and apply carpet glue behind the mat and on the plywood as well.
Now position the mat to the plywood again and let the glue set in. wait for some moment.
You can walk around on the turf you just glued down ensuring good contact with the glue and to make sure there are no bumps or ridges. Do the same to the rest of the area as well.
Step 7: Cutting the hole in mat and finishing touches
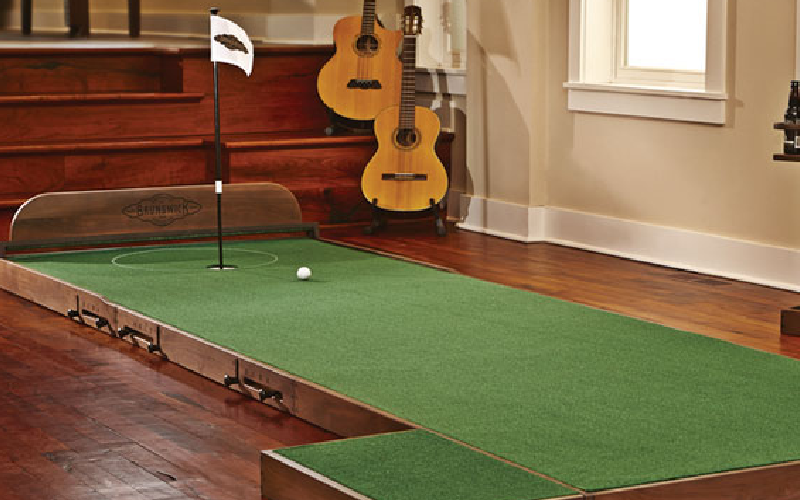
Your putting green is almost ready now, just cut the mat in the hole area marked earlier with a knife and put the flag stand in the cup.
The finishing touch will reflect the overall outcome. Cut the extra mat (if any) going away from the frame and in the hole. Straighten the boundary frame.
You can color it to have a glossy finishing. And now you are ready to roll the ball in the putting green.
Frequently Asked Questions on Making Indoor Putting Green
There are lots of questions searched in google every month related to indoor putting green and We are often asked the following questions too on different sources.
So we thought of answering them here. If you have more questions related to this process comment below. We will get back to your questions.
How much does a custom indoor putting green cost?
Actually, the answer varies from person to person and place to place. But definitely, it should be less than what putting green costs.
On average to complete the process discussed here can cost you around $300.
But note that it can be less than $300 based on location and your preferences on individual items. Similarly, it can go beyond $300 if you look for premium goods.
How long does it take to build an indoor putting green?
It should not take more than five (05) hours to make an indoor putting green on the aforementioned method once you have all the essentials with you.
But depending on your experience, you can build your putting green within a couple of hours.
If you decide to paint the frame it might take a bit longer for drying but you should still be able to finish it all within a day.
What is the best indoor putting green?
If you do not have enough time to make indoor putting green or think it’s more hassle and prefer buying one. You can do that too.
Check out what our experts say about the 10 best putting greens here.
Video On Making Indoor Putting Green
Pictures express thousands of words, so do videos. Here is the video we found that matches with our method mostly.
Conclusion
Sounds easy, isn’t it? Try it now and see what you come up with. Share your thoughts in our comments section.
Let us know if you have any queries too. I hope that you will enjoy your putting green as much as we have enjoyed building and using ours.
Hello,
Was reading thru your at home putting green article. I am looking at building a simple 8×8 one in my basement. My question is if I want to be able to make breaks or slopes in it, how would you suggest doing that? I was thinking carriage bolts and washers but I am not sure.
Thanks