
Who likes to repeatedly damage the walls by hitting the golf ball? Is that what you do while using the best home golf simulators?
I would not have done it if I were you! Not just the facing wall; an errant shot can hit the side walls, too. To protect the wall of the indoor golf simulator from shots, most golfers like to put nets behind the impact screen. Some may hang the Impact screens on the ceiling, which is costly and requires much hard work.
This is why having a golf simulator enclosure is crucial to have. You can take service from others to build your golf simulator and its enclosure.
But that cost will rise to your expense too. How about a DIY enclosure kit, like building your home golf simulator? You can do it yourself (DIY).
It is easy to set up and economical, too. This article is all about DIY golf simulator enclosure.
DIY Golf Simulator Enclosure
Be sure about the available space measurements before purchasing the enclosure kit. A bigger screen will produce more detailed visuals than a small ones.
The 16:9 aspect ratio is perfect HD dimensions.
In this article, our measurements are mentioned for building a 16′ x 9′ x 4′ (wide x height x deep) aspect ratio enclosure. Based on your available space, you can buy a DIY golf enclosure from a nearby indoor golf shop or online like Shop Indoor Golf and Carls Place.
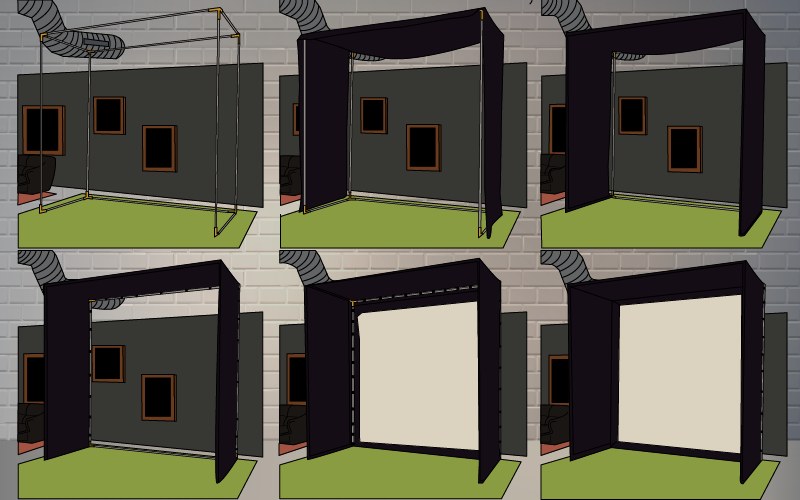
We have segmented the complete process into three (03) stages to understand better. They are framing, attaching the screen, and covering it.
Stage 1: Framing the metal frame.
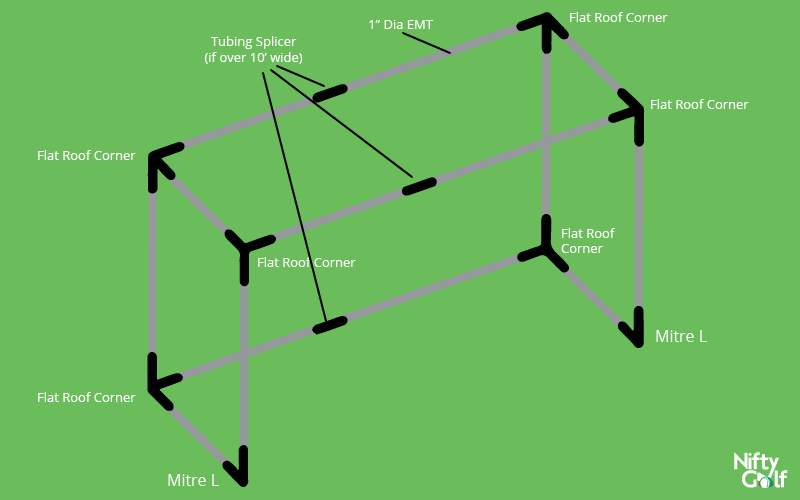
Firstly, you will need to build the frame of the enclosure. You will require the following items with you.
- 1inch Electrical Metallic Tube conduit
- 10inch long pipes – 11 pcs (EMT Pipe)
- Pipe cutter
- Connector fittings
- Flat Roof Corner – 6pcs
- Mitre L – 2pcs
- Tubing Splicer ( for <10inch wider only) – 3pcs
- 6inch Foam Pipe Insulation -18pcs
Once you have all the ingredients, you can start the process now.
Step 1: Cut the pipes according to the measurements mentioned with help from the pipe cutter.
Step – 2: Then fit them like the following diagram using proper connectors (shown in the picture). Keep it loosened at first so you can adjust it later if it bends and shapes differently than your expected size outcome.
Step – 3: Once they are in proper shape, tighten down the connector screws.
Stage 2: Attaching the screen
In this stage, you will need the following ingredients:
| Item | Use & Frequency | Quantity |
|---|---|---|
| 32mm Tube Clips | every 4 feet or so on the top and bottom of the screen | 20 pcs |
| Tarp Clips | every 2 feet or so on the sides of the screen | 12 pcs |
| 6″ Ball Bungees | wrap around the side pipes and attach to the tarp clips | As needed |
To assemble your DIY golf simulator enclosure, you’ll need specific items and quantities. Here’s a breakdown of what you’ll need and how to use them:
- 32mm Tube Clips: These clips are used to secure the top and bottom of the screen. Attach them approximately every 4 feet along both sides. You’ll need a total of 20 tube clips for this purpose.
- Tarp Clips: These clips are used to secure the sides of the screen. Attach them approximately every 2 feet along both sides. You’ll need a total of 12 tarp clips for this purpose.
- 6″ Ball Bungees: These bungees are used to wrap around the side pipes and attach to the tarp clips, providing additional support. Use as many as needed to ensure a secure attachment.
Following these quantities and guidelines, you can create a sturdy and reliable DIY golf simulator enclosure.
This is the simplest of the three stages. The objective in this stage is to attach the screen to the frame we made in Stage 1.
Ensuring the tension of the golf screen is as good as there will be no wrinkles and the ball will not bounce off too often. There are many screens available with attaching holes pre-installed.
If you have such kinds of screens, you might not need the clips. If you don’t own that sort of screen, no worries, this stage is easy.
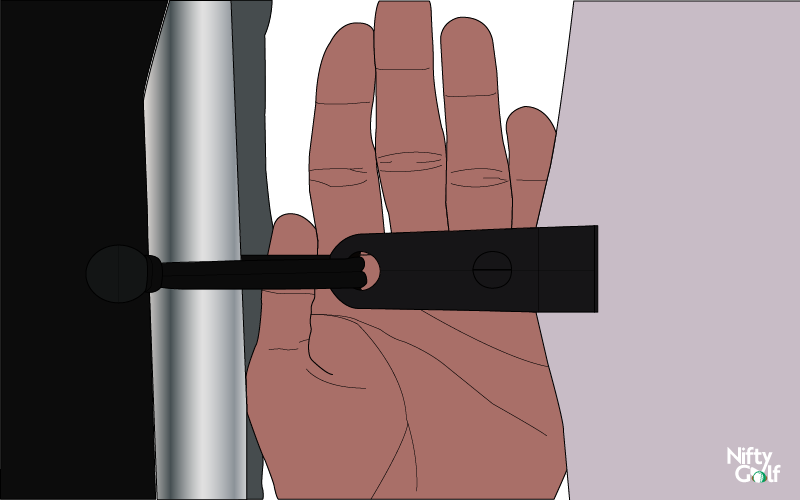
Attach the tarp clips to the sides of the screen, maintaining equal distribution on each side and proper gaps between each clip. These clips can be tightened or loosened later.
So, don’t bother about it now. Fix all the clips to the screen first, then adjust them.
When the clips are tight enough to hold the screen in good tension, attach the ball bungees with it, then seal it to the frame. See the image for reference.
Now, affix the cover over the frame to the pipes with the 32mm Tube Clips listed earlier. Again, you may not need this if you have an impact screen with velcro straps on top. Then, just roll over the frame and attach it with velcro straps.
Stage 3: Covering all the sides of the enclosure
Your enclosure should be visible with the impact screen if you have followed the process correctly. Now it is time to cover the gaps in each side to protect the surroundings from any damage from errant shots.
Firstly, pull your enclosure from the back and do the attaching on the back portion of the frame, too. Make sure you have proper tension on the screen from all sides.
Then, find the gaps from where a ball can pass and cover them with the extra black cloth width you should have with your enclosure.
Now, you are all set to use your enclosure.
Frequently Asked Questions on Golf Simulator Enclosure
Golfers are often found asking the following questions about golf simulator enclosures on different platforms.
So, here we sorted them so that you can have all your questions answered.
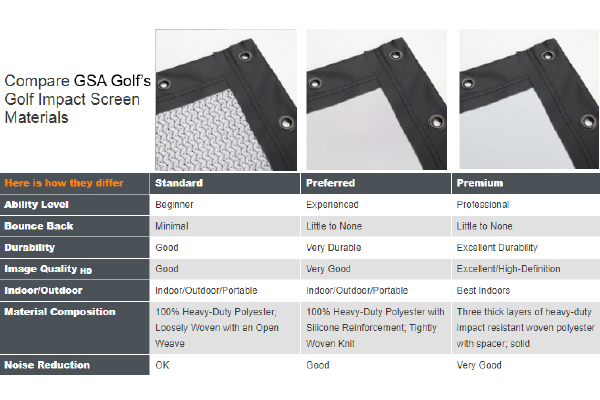
What are the differences between different golf Impact screens?
Quality and features are the major differences between standard impact screens and premium or preferred indoor golf simulator screens.
The differences are better understood in the table than discussion.
How do you hang impact screens from the ceiling in golf?
Hopefully you already know the answer because we have elaborated on the process in this article already.
In summary, The golf simulator impact screen can be hung in a frame using 1” EMT pipes with support on all 4 sides. Or it can be mounted on a wall.
Or you can even hang it with a pole running across the top and bottom. Then the golf screen is hung from the ceiling and draped on the floor.
How much room do you need for a golf simulator?
Bigger the better. The hardest part about setting up your golf simulator will be finding the right space.
A common area of space that best home golf simulators uses is 10 feet wide by 15 feet long by 10 feet high.
In this article, we discussed about 16′ x 9′ x 4′ (wide x height x deep) which is perfect for HD screening.
How long does it take to set up an enclosure?
Once you have all the essentials for the process, the complete process from assembling the framing to covering the gaps should not take more than one and a half hours.
But it might vary on the expertise.
Conclusion
DIY Golf simulator enclosure assembles in a few simple steps that you can do-it-yourself and minimize your cost on golf simulator build up.
The process we explained here is the easiest DIY method you might find on the internet. Try it, and let us know how it worked for you.
If you face any trouble understanding the process or while executing it, let us help you by commenting below or mailing to us.
where do you get the fabric that goes over the enclosure?