
Do you often find yourself playing a shot straight but curves hard to the right in the air (for a right-handed player) and falling into the roughs or even water hazards? How embarrassing would it be to see your shot going away from the hole, hitting an object, or going on to the rough or into the water hazards?
If the symptoms we described earlier match you, you probably have a slicing issue and cannot control it. So, what is a slice shot in golf?
Table of Content
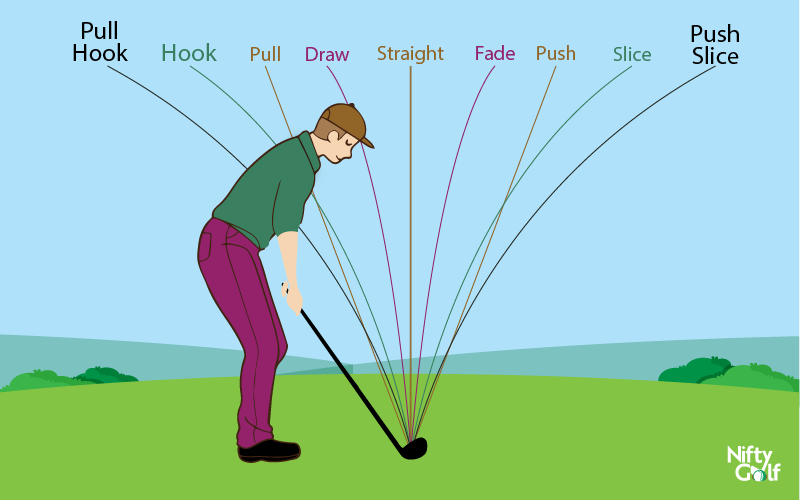
Understanding the Slice
A slice is any shot that bends to the right in the air (for a right-handed player) or left in the air (for a left-handed player). Professional golfers can play the slice deliberately and control it. Not only the slice, but they are also actually capable of playing and controlling different shots. Control of each stroke, whether hitting from the tee, chipping, or putting the balls, is crucial.
Suppose you are practicing hard on putting the ball into the hole and successfully doing it, but it takes 2-3 strokes more than par to reach there. What’s the point of practicing so much putting drills if you can’t even take the ball to the fairways?
It may cause you to lose distance, accuracy, and your temper more importantly, if you tee off properly and cover a good ground from the first shot, you will have a head start to that round.
Don’t worry, you are not alone in this sort of problem. This is the article where you will have a complete guide about fixing your slice with a driver the easiest way.
How to Fix Your Slice (Step-by-Step Guide)
You need the proper grip and setup, an inside-to-out downswing path, and a square clubface to eliminate the slice. After making these corrections, you can enjoy a slice-free golf game. So, here we will explain how you can fix a slice.
The following are simple steps to straighten golf shots from slicing it. Once you know exactly what is wrong with your stroke play, you can jump onto that specific point and rectify it. If you don’t know the specific factor that bothers you, follow the steps in the same order described.
Remember, We are directing you as a right-handed player. If you are left-handed, do the process using the left hand.
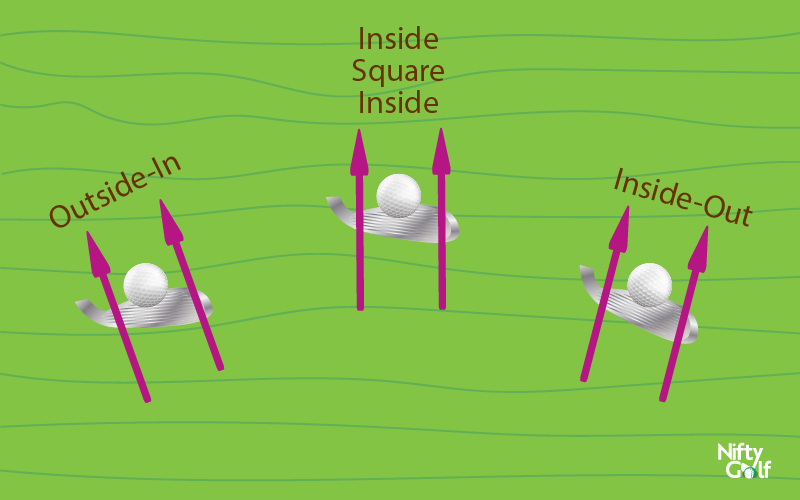
Firstly, you need to find out why you keep slicing your driver to control it. A poor grip and setup, an outside-to-in downswing path, and an open clubface cause a slice shot. An outside-to-in path occurs when the golfer reaches too far on the downside, bringing the club down to the right of the ball (outside), relative to the target line.
Step 1: Correct Alignment and Aim
Aim to the hole as if your shot is going to hit the hole directly. Don’t aim otherwise. A common response I found from golfers who regularly slice their drives is to aim left. However, this makes sense for professionals or golfers who can control it: if you’re confident your ball will move significantly left to right, you can aim left. Even if you aim left, we mean to aim slightly left of the target, not 50 yards away from the roughs.
But it is suggested that you should not have a bad habit of aiming left too often because it makes the problem worse. You are then forced to continually make the same mistake to keep the ball in play. This reinforces a bad habit, something we don’t want to do.
Step 2: Proper Ball Positioning
You might own one of the best golf balls to perform better. With the help of the right golf ball, you may tailor your swing style and the flight of your golf balls. It may also help you with the green to an extent. But positioning the ball and having the right stance is more important than owning a good golf ball. This is the simplest of problems that can immediately fix your slice.
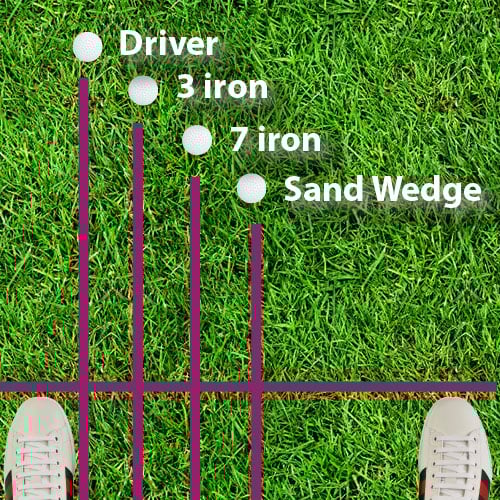
Push the ball back in your stance, and you’ll have a much more natural swing. If you’re hitting a driver (when it is most likely to cause a devastating slice), the ball should be slightly inside your left heel. But for 3 iron or 7 iron, the ball should be placed inside. So, adjust your ball position according to your shot requirement. You can get help from the ultimate ball position guide as well.
Step 3: Grip Adjustments and Strength
A wrong grip can impact your control over your golf shots. Analyze your grip now and check if/whether it is okay or not. If your left hand (assuming a right-handed golfer) is too far underneath the club at the point of setup, that inevitably opens the clubface, which might cause you a slice.
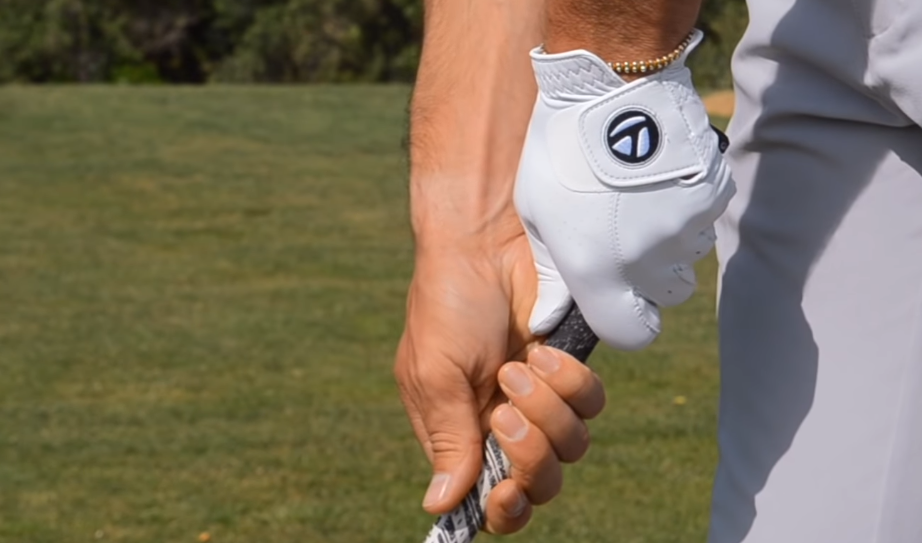
Grip the club with the left hand first (again, for a right-handed golfer). Position the grip mainly in the fingers of your left hand. With the club grounded, you should be able to see at least two knuckles of your left hand as you look down at the club.
Golfers with a big slice should strive to see three knuckles of the left hand. The “V” formed by your left index finger and thumb should point toward your right shoulder. Set your right-hand grip to compliment the left. The “V” formed by your right index finger and thumb should also point to your right shoulder.
Step 4: Posture and Stance Monitoring
The basic weight transfer in golf is that your weight should move more towards your back foot as you swing back, then return towards your front foot as you begin your downswing and hit the ball. This is very simple, yet many golfers forget to repeat this on each shot or have a transfer skill flaw. The common mistake golfers make is taking the weight to the back foot while backswing but leaving it there even when they swing it front and don’t release the club.
Developing a proper release can take some practice, there is only a split-second difference between a timely forearm release – and a straight drive – and a forearm release that comes too late. So, practice it a few times, at least 10-15 times, for better outcomes. You can get help from our ultimate swing guide, where I discuss how you can master a swing from the basics.
Step 5: Achieving the Right Swing Path
You should have a straight shot when you have clubs, balls, and grip correctly. Even if, with all these, you cannot have a straight shot rather than a slice, it is high time you focus on your swing. Inside out swing or Square to square, whichever swing you practice playing with may need some modification.
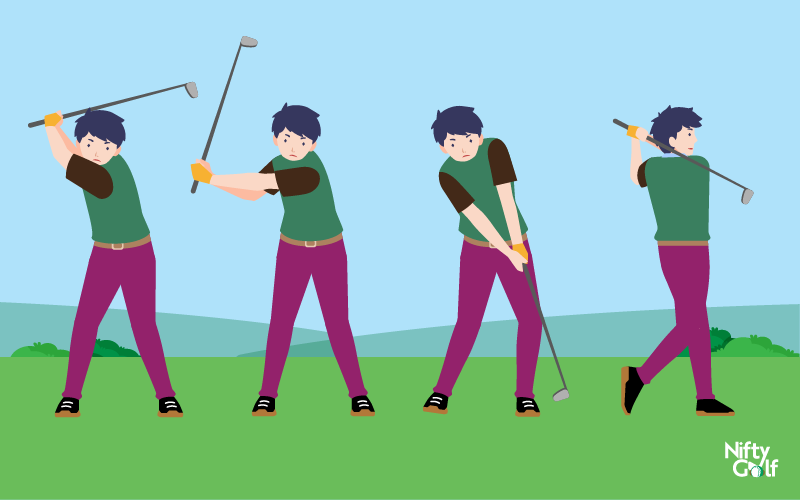
For a proper swing, you must swing the club back until you see your left shoulder under your chin. Your shoulder turns, and the backswing is complete once you get the left shoulder under your chin. You can swing the club on an inside-to-out path with the proper shoulder turn.
Square the clubface by rotating the club’s toe (outside edge) over the heel (inside edge) as you swing through impact. This eliminates an open clubface at impact, which contributes to a slice. Rotating the toe of the club over the heel will straighten out your ball flight or produce a slight right-to-left flight.
Step 6: The Importance of Club Selection
Choosing the right golf club, like the right balls and ball position. Every golf club has its unique features and purposes. You can’t hit with the same club every time, whether it’s a putter, driver, or even the irons. You can skip this section if you know which club to use when and use it properly. This is to recheck that the wrong club selection does not cause your slices.
Advanced Techniques and Drills
Minimizing Wrist Extension at the Top of the Swing
To refine your swing, focus on minimizing wrist extension at the top. This advanced technique involves maintaining a firm but flexible wrist position during the backswing to enhance control and consistency. Emphasize a smoother transition and avoid overextending the wrists, which can lead to erratic shots and potential slicing issues.
Controlling the Clubface through the Shot
Mastering control over the clubface throughout the swing is pivotal for accuracy. Techniques involving grip pressure adjustments and maintaining a square clubface position through impact help mitigate unwanted slices. This control ensures a cleaner strike, reducing the likelihood of the ball veering off course.
Swing Path Adjustments and Drills
Various drills like the Club Path Drill or Club Face Drill aid in refining swing path and clubface orientation. These drills target specific aspects of your swing mechanics, assisting in correcting slices by ingraining proper swing paths and clubface control into muscle memory.
Weight Transfer and Release Techniques
Enhancing weight transfer during the swing, from back foot to front, coupled with proper release techniques, significantly impacts shot accuracy. Focus on shifting weight efficiently and timing the release for a powerful yet controlled strike.
Specific Drills for Practice
Utilize specialized drills such as the Hank Haney Slice Drill or the Muscle Confusion Drill to address slice-related issues. These drills offer targeted practice methods to rectify common slicing tendencies and foster consistent, straighter shots.
Equipment Check and Adjustments
Evaluating and Adjusting Your Equipment:
Regularly assess your golf equipment to ensure optimal performance. Checking club alignment, grip condition, and shaft flexibility contributes to a more reliable swing. Make necessary adjustments or replacements to maintain peak performance.
Importance of Using a Driver Fit for the Job:
Selecting a driver suited to your swing style and skill level is paramount. Considering factors like loft, shaft flex, and clubhead design, a properly fitted driver can significantly mitigate slicing tendencies and enhance overall performance.
Understanding ClubFace Dynamics:
Delve into the dynamics of the clubface, comprehending how its orientation influences ball flight—understanding how adjustments in the clubface angle impact shot direction empowers golfers to make informed decisions during play.
Common Mistakes and How to Avoid Them
Identifying and Correcting Common Slice-Related Mistakes:
Recognize and rectify common errors associated with slicing, such as an open clubface or an improper swing path. Addressing these mistakes through targeted drills and adjustments leads to improved shot consistency.
Misconceptions in Slicing:
Dispelling misconceptions like habitually aiming left or neglecting ball positioning as remedies for slicing is crucial. Instead, focus on correcting fundamentals and techniques outlined earlier in this guide to combat slicing issues effectively.
How to Fix a Slice (Video Demonstration)
A visual can express thousands of words easily. The following video summarizes what I explained here to help you understand better.
Concluding Remarks
Control of each stroke, whether hitting from the tee, chipping, or putting the balls, is crucial. Professional golfers stand out because they can control their shots and achieve the expected outcomes. Slicing a shot is a common problem at the beginner level, so we discussed the solution in this article with 6 simple stages.
Though we have described it from a right-handed golfer’s point of view, if you are a left-handed golfer, do the same; just interchange your main hand.
The attached video from Rick Shiels PGA is the visual form of what I analyzed and described in the article. This will help you better understand. If you have any queries or further problems, you need to discuss them and let us know, and we will cover them.